아무런 생각없이 인텔리제이에서 자바프로젝트를 생성해서 자바8 코딩을 연습해보려고 하는데 거북스럽게 뜨는 빨간줄들!!

거기에 “lambda expressions not supported at this language level” 메시지가 뜬다.

'Project Structure' 창을 열어 'Project language level' 을 8에 맞춰도 위의 빨간줄과 팝업이 사라지질 않는다.

그러다가 '설마?' 하는 마음에 'build.gradle' 을 열어보니 아래 항목이 똬악!

sourceCompatibility 는 자바소스를 컴파일링하는데 사용할 자바버전을 지정하는 항목인데 인텔리제이에서 생성하는 템플릿의 버전이 1.5로 되어 있는 것을 발견하지 못하고 프로젝트 설정부분에서만 깨작거리고 있었는데...!!

`build.gradle`  에서 `sourceCompatibility` 를 제외하니 빨간줄과 팝업이 사라졌다. 흠냐.

문제가 생기면 그 발생한 부분에 너무 함몰되어 전체적으로 살펴보려는 것을 나중에 하는 이상한 습관이 들어버린 듯 하다. ㅡ_-);;

반성하자.


인텔리제이 12버전인가를 사용했던 기억이 나는데...

4년만에 다시 사용하려고 하니 너무나 낯설다.

그렇다고 해서 이클립스를 잘 사용한 건 아니지만...

Evolve your Database Schema easily and reliably across all your instances

데이터베이스 스키마의 변화를 손쉽게 관리

하는 기능을 가진 기술


1. FlywayDB 소개

1.1. 왜 DB Migration 을 사용하는가?

각기 다른 데이터베이스에서 동일한 DB스키마를 유지할 수 있는 기능이 필요하다.
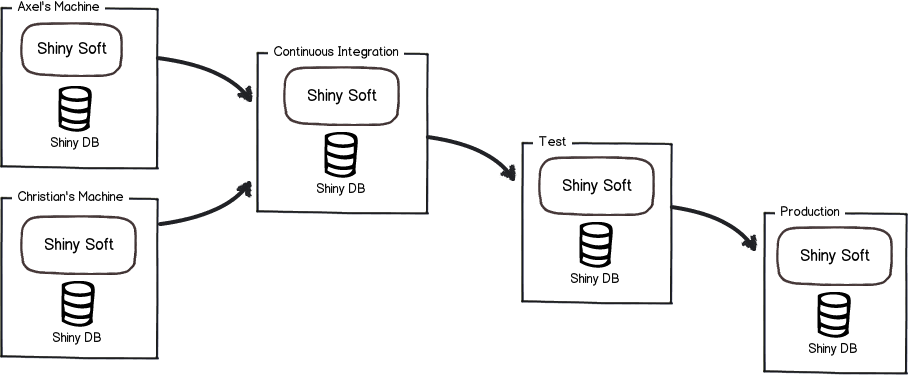
 Shiny DB migration

  • 코드쪽에서는 꽤 괜찮은 해결책들이 있다.

    • 버전관리 도구는 보편적으로 사용되고 있다
    • 재현가능한 빌드와 지속적인 통합을 실시
    • 괜찮게 정의된 릴리스 및 배포 프로세스를 가지고 있다.
  • 그런데 데이터베이스는??

    • 많은 프로젝트가 수동으로 SQL을 실행하는 방식 수행
    • 이 과정에서 많은 문제가 발생함
      • 각 데이터베이스마다 DB 스키마의 구조가 달라질 수 있는 문제가 발생
    • 관련된 많은 질문들
      • 이 시스템의 데이터베이스는 어떤 상태입니까?
      • 이 스크립트는 이미 적용 했습니까?
      • 제품에 적용한 긴급수정사항은 테스트 데이터베이스에 적용했습니까?
      • 어떻게 새로운 데이터베이스 인스턴스를 설정합니까?

        보다 많은 질문들에 대해서는: 모르겠다!!

  • 데이터베이스 마이그레이션으로 이 무제들을 해결할 수 있다!

    • 처음부터 데이터베이스를 재작성하고
    • 데이터베이스가 어떤 상태인지 확인가능하고
    • 새로운 데이터베이스에 현재 적용되어있는 방식으로 마이그레이션 가능

2. FlywayDB 동작방식 설명

Empty Database

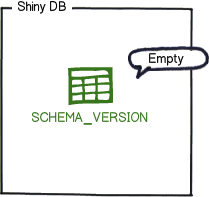
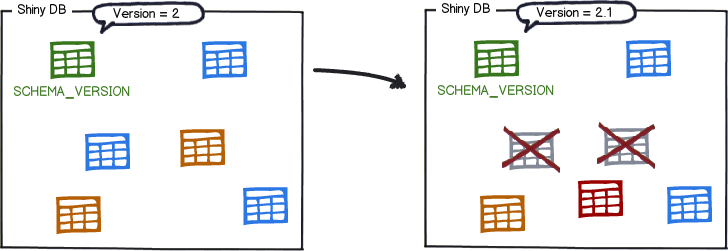
마이그레이션 버전 1, 버전 2가 있는 상황에서 flyway는 SCHEMA_VERSION 라는 이름의 비어있는 단독 테이블을 생성한다.

Emtpy schema version table

테이블이 생성되면 flyway는 즉시 파일시스템 혹은 애플리케이션의 마이그레이션을 위해 지정된 클래스패스에서 SQL 혹은 JAVA 파일을 탐색한다. 탐색된 파일들은 버전에 따라서 정렬하여 실행한다. execute migration

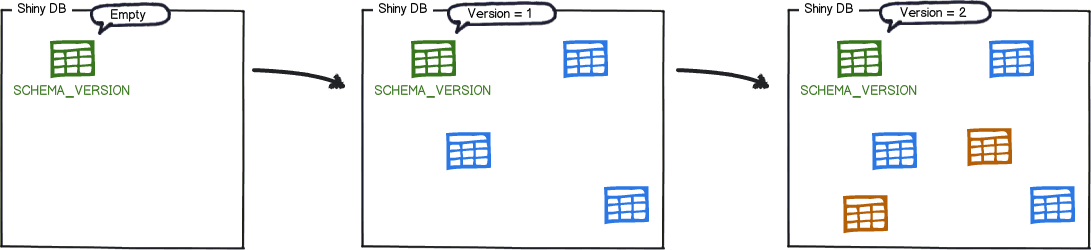
마이그레이션 버전1, 버전2가 각각 실행되면 SCHEMA_VERSION 테이블에는 다음과 같이 마이그레이션 이력이 저장된다.

Table schema_version

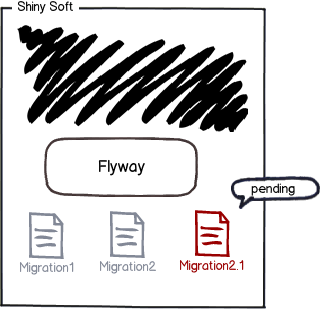
애플리케이션이 실행될때마다 flyway 설정에 따라서 파일과 SCHEMA_VERSION의 변동사항을 확인하나. 새로운 버전의 파일이 추가되면 실행하고 그 변경이력을SCHEMA_VERSION에 추가한다.

Pending Migration

마이그레이션 버전 2.1 후 변동사항

SCHEMA_VERSION의 변동사항

참 쉽죠??


3. 프로젝트 적용

3.1. SpringBoot 설정

스프링부트에서는 데이터베이스 마이그레이션을 지원한다. 그 중에서 Flyway를 채택했다. 이전 프로젝트에서는 Carbon5(c5-db-migration) 라고 하는 마이그레이션 도구를 사용했는데...

  • Maven만 지원했음
  • 지원이 사라짐...

그러다가 발견한 것이 Flyway. 손쉽게 사용가능함.

3.1.1. 의존성 추가

Maven

  • Flyway: maven
    <project ...>
    ...
    <build>
      <plugins>
        <plugin>
          <groupId>org.flywaydb</groupId>
          <artifactId>flyway-maven-plugin</artifactId>
          <version>3.2.1</version>
          <configuration>
            <url>jdbc:h2:file:target/foobar</url>
            <user>sa</user>
          </configuration>
          <dependencies>
            <dependency>
              <groupId>com.h2database</groupId>
              <artifactId>h2</artifactId>
              <version>1.3.170</version>
            </dependency>
          </dependencies>
        </plugin>
      </plugins>
    </build>
    </project>

Gradle

buildscript {
    repositories {
        mavenCentral()
    }
    dependencies {
        classpath 'com.h2database:h2:1.3.170'
        classpath 'org.flywaydb:flyway-gradle-plugin:3.2.1'
    }
}
 
apply plugin: 'org.flywaydb.flyway'
apply plugin: 'java'
 
flyway {
    url = 'jdbc:h2:file:target/foobar'
    user = 'sa'
}

SpringBoot

dependencies {
  /**
   * http://flywaydb.org/
   * Database Migration tool
   */
  compile "org.flywaydb:flyway-core"
}

3.1.2. application.yml(or properties) 설정

DB를 초기화하는 다양한 방법들이 있다.

  • JPA 에 의한 초기화
  • Hibernate 에 의한 초기화
  • JDBC에 의한 초기화
  • Batch를 이용한 초기화

그보다 높은 차원에서 손쉽게할 수 있는 것들이 있는데, 그중 하나가 바로 Flyway

flyway:
  enabled: true
  check-location: true # 마이그레이션 스크립트 파일이 존재하는지 여부를 확인
  locations: classpath:db/migration # 마이그레이션 스크립트 위치
  baseline-version: LATEST # 마이그레이션을 시작할 번호
  sql-migration-prefix: V
  sql-migration-suffix: .sql
  url: jdbc:h2:file:~/.database/flywaydb;DB_CLOSE_DELAY=-1;AUTO_SERVER=TRUE;DB_CLOSE_ON_EXIT=FALSE;  # Flyway 소유의 데이터소스를 생성하려고 하는 경우 사용
  user: sa # Flyway 소유의 데이터소스를 생성하려고 하는 경우 사용
  password: # Flyway 소유의 데이터소스를 생성하려고 하는 경우 사용

Flyway에 지정할 수 있는 속성은 다음과 같음

# FLYWAY (FlywayProperties)
flyway.*= # Any public property available on the auto-configured `Flyway` object
flyway.check-location=false # check that migration scripts location exists
flyway.locations=classpath:db/migration # locations of migrations scripts
flyway.schemas= # schemas to update
flyway.init-version= 1 # version to start migration
flyway.init-sqls= # SQL statements to execute to initialize a connection immediately after obtaining it
flyway.sql-migration-prefix=V
flyway.sql-migration-suffix=.sql
flyway.enabled=true
flyway.url= # JDBC url if you want Flyway to create its own DataSource
flyway.user= # JDBC username if you want Flyway to create its own DataSource
flyway.password= # JDBC password if you want Flyway to create its own DataSource

3.1.2. 디렉토리 설명

3.2. 스키마 관리방법 설명

  • 프로젝트의 소스코드와 함께 관리한다.
  • 로컬, 테스트와 출시 버전을 분리한다.
    • 로컬, 개발은 update로도 충분...
    • 테스트, 운영 등 서버는 validate 모드로 관리
  • 프로젝트의 버전관리시스템에 기능을 활용하여 버전관리가 가능

3.2.1. DB 스키마 추출방법

어디까지나 수동.... 처음에는 수동처리가 필요함...

  1. 로컬 테스트에서 Hibernate에서 DDL 쿼리를 생성하도록 정의 생성하도록 설정

    jpa:
    hibernate:
     ddl-auto: create-drop
  2. 테스트를 실행

    사용할려는 DB에 따라 생성하는 SQL 스크립트가 달라질 수 있는데, 이는H2Database 에서 제공하는 기능을 활용하여 MySQL, Oracle 등으로 변경하면 하이버네이트의 방언Dialect 에 의해 적절한 쿼리가 생성됨

  3. 쿼리를 복사하여 손질


  4. 처음 쿼리는 V1__init_db_schema.sql 로 생성

3.2.2. 변경이력 관리

프로젝트 내에 포함되어 있으니 모든 것을 형상관리시스템에 맡긴다.

3.3. 활용방안

  • 제품 출시 후 DB 스키마를 초기화하는 것이 아니라, 출시 이후 변경된 사항들에 대한 형상을 관리할 수 있다.
  • 위에서 설명한 동작방식을 상기하기 바란다.


스프링부트 소개

0. 스프링부트SpringBoot란?

Spring Boot makes it easy to create stand-alone, production-grade Spring based Applications that you can "just run". We take an opinionated view of the Spring platform and third-party libraries so you can get started with minimum fuss. Most Spring Boot applications need very little Spring configuration.

  • 스프링부트는 단독실행되는, 실행하기만 하면 되는 상용화 가능한 수준의 스프링 기반 애플리케이션을, 쉽게 만들어낼 수 있다.
  • 최소한의 설정으로 스프링 플랫폼과 서드파티 라이브러리들을 사용할 수 있도록 하고 있다.

스프링 기반의 애플리케이션을 개발하기 쉽도록 기본설정되어 있는 설정을 기반으로 해서 빠르게 개발할 수 있도록 해주는 개발플랫폼이랄까?

0.1. 스프링부트 기능

  • Create stand-alone Spring applications

    단독실행가능한 스프링애플리케이션을 생성한다.,

  • Embed Tomcat, Jetty or Undertow directly (no need to deploy WAR files)

    내장형 톰캣, 제티 혹은 언더토우를 내장(WAR 파일로 배포할 경우에는 필요없음)

  • Provide opinionated 'starter' component to simplify your build configuration

    기본설정되어 있는 'starter' 컴포넌트들을 쉽게 추가

  • Automatically configure Spring whenever possible

    가능한 자동설정되어 있음

  • Provide production-ready features such as metrics, health checks and externalized configuration

    상용화에 필요한 통계, 상태 점검 및 외부설정을 제공

  • Absolutely no code generation and no requirement for XML configuration

    설정을 위한 XML 코드를 생성하거나 요구하지 않음


1. 스프링부트 시작하기

1.1. 스프링부트 프로젝트 생성하기

  • 주의사항

    • 네트워크가 연결되어 있어야 한다.

      그렇다면, 네트워크가 연결되지 않은 인트라넷 환경에서는 어떻게 해야할까? = 넥서스Nexus 에 스프링부트 설정을 해야겠지요? 사실, 안해봐서 모르겠음. @_@);;

    • Maven 혹은 Gradle 플러그인이 IDE에 설치되어 있어야 한다.

1.1.1. http://start.spring.io/ 에서 생성하기

1.1.1.1. 프로젝트 메타데이터를 등록

  • Maven 보다는 Gradle
    • Maven 예제가 많은 편이지만, Maven의 골, 페이즈만으로는 프로젝트의 필요한 기능을 모두 지원하지 못할 수도 있음
    • Gradle은 Groovy DSL로 구성되어 있어서 그루비를 익혀야하지만, 지원되는 기능을 익히고 나면 훨씬 강력해짐
  • 배포형태에 따라서 war 또는 jar
    • 기본적으로는 단독실행가능지만, 프로젝트 환경에 따라 배포할 수도 있으니 war도 가능

1.1.1.2. [Generate Project] 버튼클릭

  • 'artifact' 이름으로 된 zip 파일 다운로드

1.1.1.3. IDE에서 Import Project

1.1.2. STS에서 생성하기

1.1.2.1. [File]-[New]-[Spring Starter project] 선택

1.1.2.2. 사용하려는 스프링 starter 선택

  • 최초에는 필요한 라이브러리들을 다운로드 받는데 상단한 시간이 소요된다.

1.2. 스프링부트 프로젝트 실행

  • [Run as] - [Spring Boot App] 선택
  • [gradle] - [Tasks quick launcher] 을 이용해서 실행
    • 프로젝트 지정된 JDK 버전과 IDE 실행 JDK 버전이 다르면...
  • 프로젝트 생성 위치에서 $ gradle bootRun 명령 실행

2. 스프링부트 구성 살펴보기

2.1. 최초 생성된 스프링부트 프로젝트 살펴보기

2.1.1. jar 프로젝트

  • build.gradle
//코드 생략
apply plugin: 'java'
apply plugin: 'eclipse'
apply plugin: 'idea'
apply plugin: 'spring-boot'
apply plugin: 'io.spring.dependency-management'
 
jar {
    baseName = 'demo'
    version = '0.0.1-SNAPSHOT'
}
//코드생략
dependencies {
    compile("org.springframework.boot:spring-boot-starter-web")
    testCompile("org.springframework.boot:spring-boot-starter-test")
}
  • {artifact-name}Application.java
  • IDE에서 Java Application project로 인식
  • build 태스크 실행시 demo.jar 생성
  • 실행
$ java -jar demo.jar

2.1.2. war 프로젝트

  • build.gradle
//코드생략
apply plugin: 'java'
apply plugin: 'eclipse-wtp'
apply plugin: 'idea'
apply plugin: 'spring-boot'
apply plugin: 'io.spring.dependency-management'
apply plugin: 'war'
 
war {
    baseName = 'demowar'
    version = '0.0.1-SNAPSHOT'
}
//코드생략
configurations {
    providedRuntime
}
 
dependencies {
    compile("org.springframework.boot:spring-boot-starter-web")
    providedRuntime("org.springframework.boot:spring-boot-starter-tomcat")
    testCompile("org.springframework.boot:spring-boot-starter-test")
}
  • public class ServletInitializer extends SpringBootServletInitializer 클래스가 있음
  • IDE에서 웹프로젝트로 인식
  • build 태스크 실행시 demowar.war 생성
  • 실행

2.1.3. Excutable JAR

2.2. @SpringBootApplication

  • 코드
/**
 * Indicates a {@link Configuration configuration} class that declares one or more
 * {@link Bean @Bean} methods and also triggers {@link EnableAutoConfiguration
 * auto-configuration} and {@link ComponentScan component scanning}. This is a convenience
 * annotation that is equivalent to declaring {@code @Configuration},
 * {@code @EnableAutoConfiguration} and {@code @ComponentScan}.
 * 
 * @author Phillip Webb
 * @since 1.2.0
 */
@Target(ElementType.TYPE)
@Retention(RetentionPolicy.RUNTIME)
@Documented
@Inherited
@Configuration
@EnableAutoConfiguration
@ComponentScan
public @interface SpringBootApplication {
 
    /**
     * Exclude specific auto-configuration classes such that they will never be applied.
     * @return the classes to exclude
     */
    Class<?>[] exclude() default {};
 
}
  • @SpringBootApplication 애노테이션이 선언된 애플리케이션 클래스는 패키지 루트에 위치하는 것이 좋다.
    • 물론 @ComponentScan에 별도의 패키지를 지정할 수 있지만 굳이~ 그렇게 하지 맙시다.
    • Locating the main application class 의 기본적인 구조를 따르는 걸 권장하고 싶음
      com
      +- example
           +- myproject
               +- Application.java
               |
               +- domain
               |   +- Customer.java
               |   +- CustomerRepository.java
               |
               +- service
               |   +- CustomerService.java
               |
               +- web
                   +- CustomerController.java

3. 스프링부트 설정

3.1. 스프링부트 자동설정AutoConfig

3.1.1. autoconfigure 패키지 확인

3.1.2. @Conditional, @ConditionalOnBean, @ConditionalOnMissingBean, @ConditionalOnClass 조건에 따라 스프링 빈Bean 으로 등록

  • @ConditionalOnBean
  • @ConditionalOnMissingBean
  • @ConditionalOnClass

3.2. 외부설정 하기

  • Common Application properties
  • 스프링부트의 프로퍼티스 확인순서에 따라서 외부요인들을 읽어오게 됨
  • Environment

    3.2.1. application.properties

  • PropertySource

    3.2.2. application.yml

  • YamlPropertySourceLoader

3.2.3. 프로파일즈 활용하기

  • 로컬, 개발, 테스트, 운영 설정을 각각 관리 및 적용
  • Profiles - springframework
  • 환경별 설정요소를 한곳에서 집중하여 관리할 수 있음

3.2.3.1. 기존 방식

  • 설정디렉토리를 분리
    • config/local
    • config/development
    • config/test
    • config/production
  • 빌드시 프로파일을 지정하여 지정한 설정디렉토리의 설정파일을 적용하는 형식을 취함

3.2.3.2. application.properties

  • application-{profiles}.properties
    • application-local.properties
    • application-development.properties
    • application-test.properties
    • application-production.properties

3.2.3.3. application.yaml

  • application.yaml
# 공통설정부분 지정가능
---
spring:
    profiles: local
---
spring:
  profiles: development
---
spring:
    profiles: test
---
spring:
  profiles: production

4. 스프링부트 확장하기

4.1. starter POMs 추가하기

  • Starer POMs
  • 추가시 spring.provides 에 연관된 스프링 라이브러리들이 정의되어 있다.
  • 관련 의존성 라이브러리에 대해서는 starter 프로젝트 내부에 있는 pom.xml 에 정의되어 있음

4.2. 의존성 라이브러리 추가하기

4.2.1. 의존성 버전


● 개인적 목표

  • JDK 8 이상 사용
  • Gradle 사용
  • SpringBoot 적용
    • 스프링 프레임워크 4.0 이상 적용
    • Spring Data JPA 사용


+ Recent posts