1. 스프링부트 h2console 관련 설명

스프링부트 1.3.0 부터 h2console 기능을 제공한다.

개발자 개인개발환경(로컬local)에서 개발할 때 h2database를 Database로 사용하면 개발이 매우 용이해진다. 그리고 h2database에서는 데이터베이스에 에 접근할 수 있는 클라이언트를 제공하는데 그게 바로 h2console 이다.

이전버전에서 h2console을 사용하기 위해서는 다음과 같은 형태로 ServletRegistrationBean 으로 h2에서 제공하는 WebServlet을 서블릿빈으로 등록한다.

@Bean
public ServletRegistrationBean h2servletRegistration() {
    ServletRegistrationBean registration = new ServletRegistrationBean(new WebServlet());
    registration.addUrlMappings("/h2console/*");
    return registration;
}

스프링부트 1.3.0 부터는 @WebServlet, @WebFilter @WebListener 애노테이션을 선언한 클래스들을@ServletComponentScan으로 탐색하는 기능도 제공한다.

어쨌든~~ h2console은 기본적으로 애플리케이션의 데이터에 접근하는 부분이기 때문에 보안과 관련되어 있다. 그래서 스프링부트 1.3.0에 추가된 H2ConsoleAutoConfiguration 에서 기본보안에 대한 설정을 하는 부분도 볼 수 있다.

H2ConsoleSecurityConfiguration.java
@Configuration
@ConditionalOnWebApplication
@ConditionalOnClass(WebServlet.class)
@ConditionalOnProperty(prefix = "spring.h2.console", name = "enabled", havingValue = "true", matchIfMissing = false)
@EnableConfigurationProperties(H2ConsoleProperties.class)
@AutoConfigureAfter(SecurityAutoConfiguration.class)
public class H2ConsoleAutoConfiguration {
 
@Autowired
private H2ConsoleProperties properties;
 
@Bean
public ServletRegistrationBean h2Console() {
String path = this.properties.getPath();
String urlMapping = (path.endsWith("/") ? path + "*" : path + "/*");
return new ServletRegistrationBean(new WebServlet(), urlMapping);
}
 
@Configuration
@ConditionalOnClass(WebSecurityConfigurerAdapter.class)
@ConditionalOnBean(ObjectPostProcessor.class)
@ConditionalOnProperty(prefix = "security.basic", name = "enabled", matchIfMissing = true)
static class H2ConsoleSecurityConfiguration {
 
@Bean
public WebSecurityConfigurerAdapter h2ConsoleSecurityConfigurer() {
return new H2ConsoleSecurityConfigurer();
}
 
@Order(SecurityProperties.BASIC_AUTH_ORDER - 10)
private static class H2ConsoleSecurityConfigurer
extends WebSecurityConfigurerAdapter {
 
@Autowired
private H2ConsoleProperties console;
 
@Autowired
private SecurityProperties security;
 
@Override
public void configure(HttpSecurity http) throws Exception {
String path = this.console.getPath();
String antPattern = (path.endsWith("/") ? path + "**" : path + "/**");
HttpSecurity h2Console = http.antMatcher(antPattern);
h2Console.csrf().disable();
h2Console.httpBasic();
h2Console.headers().frameOptions().sameOrigin();
String[] roles = this.security.getUser().getRole().toArray(new String[0]);
SecurityAuthorizeMode mode = this.security.getBasic().getAuthorizeMode();
if (mode == null || mode == SecurityAuthorizeMode.ROLE) {
http.authorizeRequests().anyRequest().hasAnyRole(roles);
}
else if (mode == SecurityAuthorizeMode.AUTHENTICATED) {
http.authorizeRequests().anyRequest().authenticated();
}
}
 
}
 
}
 
}

2. h2console을 사용하기 위한 설정

h2console을 사용하는 방법은 간단하다. application.yml(혹은 application.properties) 파일에spring.h2.console.* 속성을 정의하면 된다. 여기서 정의하는 속성은

H2ConsoleProperties.java
@ConfigurationProperties(prefix = "spring.h2.console")
public class H2ConsoleProperties {
 
/**
 * Path at which the console will be available.
 */
@NotNull
@Pattern(regexp = "/[^?#]*", message = "Path must start with /")
private String path = "/h2-console";
 
/**
 * Enable the console.
 */
private boolean enabled = false;
 
public String getPath() {
return this.path;
}
 
public void setPath(String path) {
this.path = path;
}
 
public boolean getEnabled() {
return this.enabled;
}
 
public void setEnabled(boolean enabled) {
this.enabled = enabled;
}
 
}

spring.h2.console.* 가 제공하는 속성은 크게 두가지다.

# H2 Web Console (H2ConsoleProperties)
spring.h2.console.enabled=false # Enable the console.
spring.h2.console.path=/h2-console # Path at which the console will be available.

위의 속성에서 볼 수 있듯이 h2console은 기본은 비활성화 되어 있다.

spring.h2.console.enabled=true
spring.h2.console.path=/h2console

로 설정하면 h2console 사용을 위한 기본준비는 끝난다.

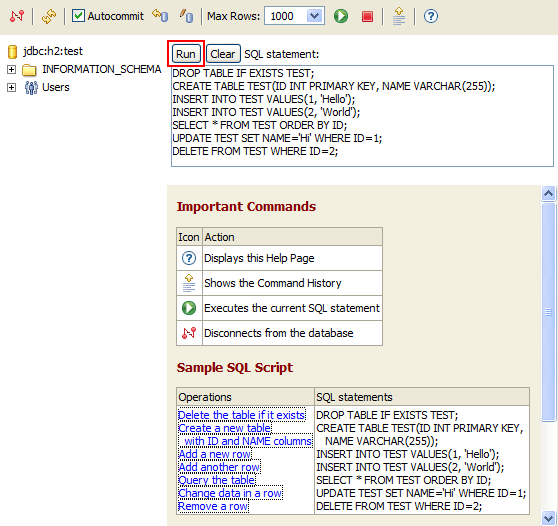
스프링부트 애플리케이션을 실행시키면 * h2console 로그인창이 뜨고 ** http://localhost:8080/h2console

h2console-loging

h2console

  • h2console 창이 뜨면 정상적으로 접근이 된 것이다.

h2console-success

h2console-success

3. h2console 로그인을 통과했는데 흰화면만 나온다면?

그런데 스프링시큐리티를 사용하고 있다면 흰화면만 나오고 화면이 뜨지 않을 수도 있다. 브라우저의 개발도구를 열어 콘솔창을 보면 다음과 같은 메시지를 볼 수 있다.

h2console-white

h2console-whitescreen

Load denied by X-Frame-Options: http://localhost:9090/h2console/header.jsp?jsessionid=62e96686014c88a9e644647c7a4bf069 does not permit framing. <알 수 없음>
Load denied by X-Frame-Options: http://localhost:9090/h2console/query.jsp?jsessionid=62e96686014c88a9e644647c7a4bf069 does not permit framing. <알 수 없음>
Load denied by X-Frame-Options: http://localhost:9090/h2console/help.jsp?jsessionid=62e96686014c88a9e644647c7a4bf069 does not permit framing. <알 수 없음>
Load denied by X-Frame-Options: http://localhost:9090/h2console/tables.do?jsessionid=62e96686014c88a9e644647c7a4bf069 does not permit framing. <알 수 없음>

스프링시큐리티에서 headers 에 있는 X-Frame-Options 옵션을 거부했기 때문에 발생한다.

그래서 스프링시큐리티 설정부분에서 아래와 같이 설정해버렸다.

@Override
    protected void configure(HttpSecurity http) throws Exception {
        http
            .authorizeRequests()
                //중략 
                .anyRequest().authenticated()
            .and()
                .headers()
                    .addHeaderWriter(new StaticHeadersWriter("X-Content-Security-Policy","script-src 'self'"))
                    .frameOptions().disable();
    }

개발하는 애플리케이션의 보안 정책에 따라서 상세하게 설정하자.

위와 같은 형태로 X-Frame-Options 옵션을 비활성화하면 h2console 화면에 접근이 가능하다.


스프링부트 1.3.0이 출시되었다.

1.3에서 추가된 부분들의 주요사항들을 살펴보면:

  • Developer Tools

    새롭게 추가된 spring-boot-devtools 모듈은 개발시 경험을 향상시키는데 초점을 두고있다. 모듈이 제공하는 기능은:

    • 민감한 속성 기본(예를 들어 템플릿 캐시를 비활성화)

    • 애플리케이션 자동 재시작

    • LiveReload 지원(살아있는 상태에서 다시 읽기…​?) 애플리케이션을 종료하지 않고도 변경사항을 다시 읽어오는 것이 가능해짐

    • 원격 개발 지원(HTTP 터널을 통한 원격 갱신과 원격 디버그 지원)

    • 재시작 동안 HTTP session 영속화

      여유가 된다면 DevTools 에 관한 짧은 소개영상을 보자.

  • Caching Auto-configuration

    EhCache, Hazelcast, Infinispan, JCache (JSR 107) implementations, Redis 과 Guava을 위한 자동설정을 제공한다. 추가적으로 인-메모리 캐시 기반의 간단한 Map도 지원한다.

  • Fully executable JARs and service support

    메이븐Maven과 그레들Gradle 플러그인을 이용해서 리눅스/유닉스에서 다음과 같은 형태로 실행할 수 있는 완벽한 실행가능한 아카이브를 생성할 수 있다.

    $ ./myapp.jar

    거기서 더 나아가, init.d 혹은 systemd 서비스로 동작한다. init.d 서비스로 설치할 때는 심볼릭만 생성하면 된다.

    $ sudo link -s /var/myapp/myapp.jar /etc/init.d/myapp
  • Color banners

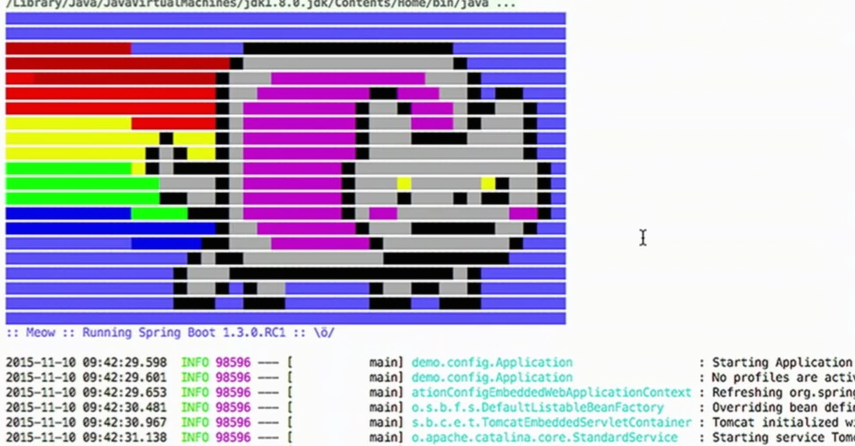
    banner.txt 파일에 ANSI 칼라코드를 포함시킬 수 있다. 이런 미친 짓(?)도 가능하다.

    Meow
    Figure 1. color banner
  • Support for @WebServlet, @WebFilter and @WebListener annotations 내장 서블릿 컨테이너를 사용할 때,@ServletComponentScan을 사용하여 활성화시킨 경우 @WebServlet, @WebFilter  @WebListener 애노테이션을 사용한 클래스가 자동 등록된다.

  • Additional auto-configurations

    다음 항목들에 대한 자동설정을 제공한다. Cassandra OAuth2 Spring Session jOOQ SendGrid Artemis

  • Actuator Metrics

    측정metric 은 반출과 집계를 지원기능이 확장되었다. 추가적으로 자바8에 정의된 GaugeService CounterService 구현체(가능하다면 사용가능한)와 성능의 향상을 제공한다.

  • Update Endpoints and Health Indicators

    /logfile, /flyway  /liquibase 액츄에이터 엔드포인트를 포함하였고 엘라스틱서치, 이메일과 JMS health indicator를 지원한다.

  • Other changes

    다른 변경사항이나 향상된 기능들에 대해서는 릴리즈 노트를 살펴보라. 다음버전에서 삭제예정의 클래스와 메서드들도 찾아볼 수 있다.


[SpringBoot] 로깅 처리

1. SpringBoot Logging

스프링부트는 Commons Logging을 사용한다. Java Util Logging, Log4J, Log4J2 and Logback에 대한 기본설정을 제공한다.

2. 로그 출력형태

스프링부트에서 출력하는 기본로그 형태
2014-03-05 10:57:51.112  INFO 45469 --- [           main] org.apache.catalina.core.StandardEngine  : Starting Servlet Engine: Apache Tomcat/7.0.52
2014-03-05 10:57:51.253  INFO 45469 --- [ost-startStop-1] o.a.c.c.C.[Tomcat].[localhost].[/]       : Initializing Spring embedded WebApplicationContext
2014-03-05 10:57:51.253  INFO 45469 --- [ost-startStop-1] o.s.web.context.ContextLoader            : Root WebApplicationContext: initialization completed in 1358 ms
2014-03-05 10:57:51.698  INFO 45469 --- [ost-startStop-1] o.s.b.c.e.ServletRegistrationBean        : Mapping servlet: 'dispatcherServlet' to [/]
2014-03-05 10:57:51.702  INFO 45469 --- [ost-startStop-1] o.s.b.c.embedded.FilterRegistrationBean  : Mapping filter: 'hiddenHttpMethodFilter' to: [/*]

출력되는 내용은 다음과 같다. * 날짜와 시간: 밀리세컨드단위로 되어 정렬가능 * 로그레벨: ERROR,WARN, INFO, DEBUG or TRACE * 프로세스ID * ---: 를 통해서 실제 로그 메시지와 구분 * 스레드 네임 * 로거 네임: 로그가 찍히는 위치 * 로그 메시지


로그백Logback에서는 FATAL 레벨이 없다(ERROR로 매핑됨)

3. logback.xml 설정

스프링부트에서는 클래스패스classpath 상에서 루트에 logback.xml이 존재하면 해당설정파일을 로깅설정에 적용한다. 그래서 스프링부트에서는 logback-spring.xml으로 설정하는 것을 권장한다. 이렇게 해두고 설정파일에서 logging.config: classpath:logback-spring.xml과 같은 형태로 설정하면 로그설정을 추가등록한다.

스프링부트에서 생성하는 로그 설정은 대략 다음과 같다.

스프링 환경시스템 속성설명
logging.exception-conversion-wordLOG_EXCEPTION_CONVERSION_WORD로깅 예외발생시 사용할 관례적인 단어
logging.fileLOG_FILE정의되어 있다면 기본로그 설정에 사용됨
logging.pathLOG_PATH정의되어 있다면 기본로그 설정에 사용됨
logging.pattern.consoleCONSOLE_LOG_PATTERN콘솔에 출력되는 로그 패턴(stdout). (JDK 로거는 지원하지 않음)
logging.pattern.fileFILE_LOG_PATTERN파일에 사용될 로그 패턴(LOG_FILE 활성화된 경우). (JDK 로거는 지원하지 않음)
logging.pattern.levelLOG_LEVEL_PATTERN출력 로그레벨 형태 사용(기본%5p). (logging.pattern.level형태는 로그백에서만 지원)
PIDPID현재 프로세스 ID(OS 환경 변수로 정의되지 않은 경우에는 발견)

4. 로그백Logback 확장

스프링부트에서는 logback-spring.xml을 설정하길 권장한다. logback.xml로 설정하면 스프링부트가 설정하기 전에 로그백 관련한 설정을 하기 때문에 제어할 수가 없게 된다.

5. 스프링부트의 로그 설정을 유지하면서 로그백을 통해서 일일 로그파일 남기기

<?xml version="1.0" encoding="UTF-8"?>
<configuration>
<include resource="org/springframework/boot/logging/logback/base.xml"/>
 
<appender name="dailyRollingFileAppender"
class="ch.qos.logback.core.rolling.RollingFileAppender">
<prudent>true</prudent>
<rollingPolicy class="ch.qos.logback.core.rolling.TimeBasedRollingPolicy">
<fileNamePattern>applicatoin.%d{yyyy-MM-dd}.log</fileNamePattern>
<maxHistory>30</maxHistory>
</rollingPolicy>
<filter class="ch.qos.logback.classic.filter.ThresholdFilter">
<level>INFO</level>
</filter>
 
<encoder>
<pattern>%d{yyyy:MM:dd HH:mm:ss.SSS} %-5level --- [%thread] %logger{35} : %msg %n</pattern>
</encoder>
</appender>
 
<logger name="org.springframework.web" level="INFO"/>
<logger name="org.thymeleaf" level="INFO"/>
<logger name="org.hibernate.SQL" level="INFO"/>
<logger name="org.quartz.core" level="INFO"/>
<logger name="org.h2.server.web" level="INFO"/>
 
<root level="INFO">
<appender-ref ref="dailyRollingFileAppender" />
</root>
</configuration>

위의 형태로 logback-spring.xml을 만들어서 ${project}/src/main/resources 에 위치시키고 application.properties 혹은 application.yml에 다음과 같이 설정한다.

  1. 애플리케이션 내 로그레벨 설정

spring.profiles: logging-info
logging:
  file: logs/application.log
  level:
    org.thymeleaf: INFO
    org.springframework.web: INFO
    org.hibernate.SQL: INFO
    org.quartz.core: INFO
    org.h2.server.web: INFO
 
---
spring.profiles: logging-debug
logging:
  file: logs/application.log
  level:
    org.thymeleaf: DEBUG
    org.springframework.web: DEBUG
    org.hibernate.SQL: DEBUG
    org.quartz.core: DEBUG
    org.h2.server.web: DEBUG
 
---
spring.profiles: logging-daily
logging:
  config: classpath:logback-spring.xml

6. 로그파일 실행

$ java -jar application.jar --spring.profiles.active=logging-debug,logging-daily

위의 형태로 실행하면, 실행한 위치에는 logback-spring.xml 설정에 의해 생성된 로그는application.2015-11-03.log 파일이 생성되고, application.yml에 설정한 logging.* 관련한 로그는 logs/application.log이 생성된다.


1. org.springframework.boot:spring-boot-actuator-docs 추가됨

SpringBoot에서 제공하는 관리기능 모듈인 Actuator에 기능 하나가 추가되었다.

org.springframework.boot:spring-boot-actuator-docs

2015/10/07 출시된 http://spring.io/blog/2015/10/07/spring-rest-docs-1-0-0-release을 기반으로 한 것으로 보이는~ 애플리케이션에 actuator 설정을 기반으로 해서 asciidoc을 생성하여 웹상에서 보여주는 기능이다. 스프링의 MockMVC 를 기반으로 해서 REST DOC를 만드는 기술을 응용한 것으로 추축된다.

이 기능을 보고는 와…!

더불어서 actuator API를 HAETOS로 처리한 화면도 보여준다.

1.1. 추가방법

build.gradle 에 org.springframework.boot:spring-boot-starter-actuator org.springframework.boot:spring-boot-actuator-docs 추가

dependencies {
    compile('org.springframework.boot:spring-boot-starter-web')
    compile('org.springframework.boot:spring-boot-starter-actuator')
    compile('org.springframework.boot:spring-boot-actuator-docs') // actuator가 함께 설치되어야 함
    compile('org.springframework.boot:spring-boot-devtools')
    compile('org.projectlombok:lombok')
    testCompile('org.springframework.boot:spring-boot-starter-test')
}


실행시 로그를 살펴보면 '/docs' 라고 하는 o.s.b.a.e.mvc.EndpointHandlerMapping 에 등록되는 것을 확인할 수 있다.


1.2. Actuator HATEOAS 적용


1.3. 각 Endpoints 에도 HATEOAS 적용


1.4. actuator API에 대한 문서가 생성되고 웹으로 접근(/docs)하여 본 화면


이 기능을 확인하고, 문득 드는 생각은...

한글로 번역한 asciidoc 템플릿을 제공한다고 하면 꽤 괜찮겠다.

스프링부트는 점점 멋있어진다. +_+)

사내 발표로 진행한 스프링부트 소개.


나는 STS로.... Gradle, YML

+ Recent posts