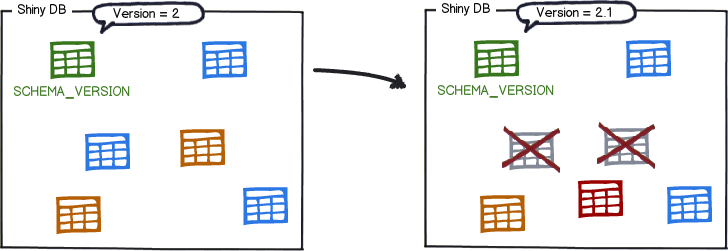
Evolve your Database Schema easily and reliably across all your instances

데이터베이스 스키마의 변화를 손쉽게 관리

하는 기능을 가진 기술


1. FlywayDB 소개

1.1. 왜 DB Migration 을 사용하는가?

각기 다른 데이터베이스에서 동일한 DB스키마를 유지할 수 있는 기능이 필요하다. Shiny DB migration
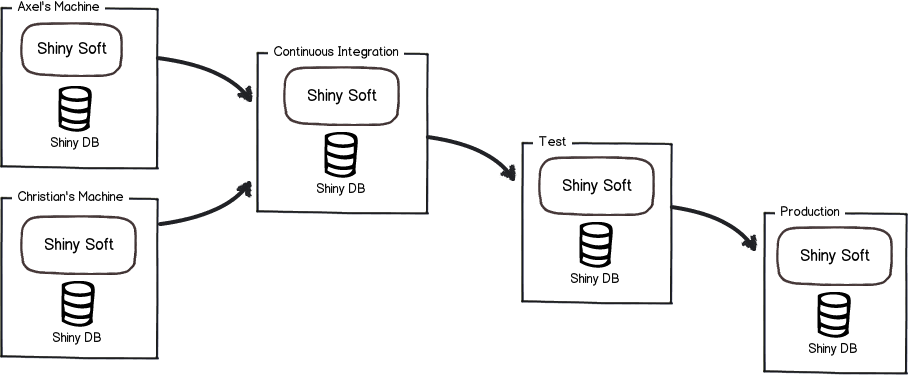
  • 코드쪽에서는 꽤 괜찮은 해결책들이 있다.

    • 버전관리 도구는 보편적으로 사용되고 있다
    • 재현가능한 빌드와 지속적인 통합을 실시
    • 괜찮게 정의된 릴리스 및 배포 프로세스를 가지고 있다.
  • 그런데 데이터베이스는??

    • 많은 프로젝트가 수동으로 SQL을 실행하는 방식 수행
    • 이 과정에서 많은 문제가 발생함
      • 각 데이터베이스마다 DB 스키마의 구조가 달라질 수 있는 문제가 발생
    • 관련된 많은 질문들
      • 이 시스템의 데이터베이스는 어떤 상태입니까?
      • 이 스크립트는 이미 적용 했습니까?
      • 제품에 적용한 긴급수정사항은 테스트 데이터베이스에 적용했습니까?
      • 어떻게 새로운 데이터베이스 인스턴스를 설정합니까?

        보다 많은 질문들에 대해서는: 모르겠다!!

  • 데이터베이스 마이그레이션으로 이 무제들을 해결할 수 있다!

    • 처음부터 데이터베이스를 재작성하고
    • 데이터베이스가 어떤 상태인지 확인가능하고
    • 새로운 데이터베이스에 현재 적용되어있는 방식으로 마이그레이션 가능

2. FlywayDB 동작방식 설명
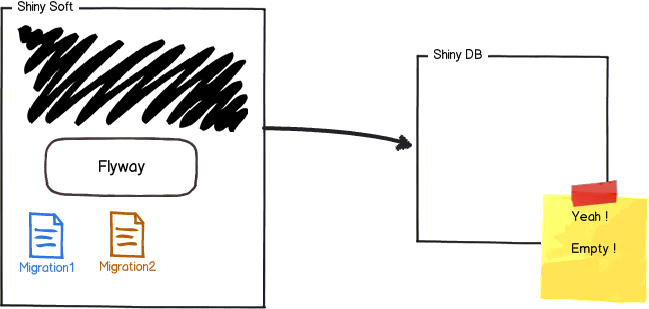
Empty Database

마이그레이션 버전 1, 버전 2가 있는 상황에서 flyway는 SCHEMA_VERSION 라는 이름의 비어있는 단독 테이블을 생성한다.
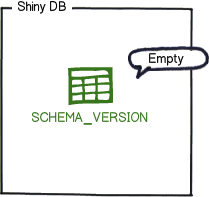
Emtpy schema version table

테이블이 생성되면 flyway는 즉시 파일시스템 혹은 애플리케이션의 마이그레이션을 위해 지정된 클래스패스에서 SQL 혹은 JAVA 파일을 탐색한다. 탐색된 파일들은 버전에 따라서 정렬하여 실행한다. execute migration

마이그레이션 버전1, 버전2가 각각 실행되면 SCHEMA_VERSION 테이블에는 다음과 같이 마이그레이션 이력이 저장된다.

Table schema_version

애플리케이션이 실행될때마다 flyway 설정에 따라서 파일과 SCHEMA_VERSION의 변동사항을 확인하나. 새로운 버전의 파일이 추가되면 실행하고 그 변경이력을SCHEMA_VERSION에 추가한다.
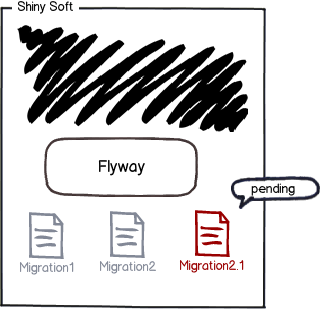
Pending Migration

마이그레이션 버전 2.1 후 변동사항

SCHEMA_VERSION의 변동사항

참 쉽죠??


3. 프로젝트 적용

3.1. SpringBoot 설정

스프링부트에서는 데이터베이스 마이그레이션을 지원한다. 그 중에서 Flyway를 채택했다. 이전 프로젝트에서는 Carbon5(c5-db-migration) 라고 하는 마이그레이션 도구를 사용했는데...

  • Maven만 지원했음
  • 지원이 사라짐...

그러다가 발견한 것이 Flyway. 손쉽게 사용가능함.

3.1.1. 의존성 추가

Maven

  • Flyway: maven
    <project ...>
    ...
    <build>
      <plugins>
        <plugin>
          <groupId>org.flywaydb</groupId>
          <artifactId>flyway-maven-plugin</artifactId>
          <version>3.2.1</version>
          <configuration>
            <url>jdbc:h2:file:target/foobar</url>
            <user>sa</user>
          </configuration>
          <dependencies>
            <dependency>
              <groupId>com.h2database</groupId>
              <artifactId>h2</artifactId>
              <version>1.3.170</version>
            </dependency>
          </dependencies>
        </plugin>
      </plugins>
    </build>
    </project>

Gradle

buildscript {
    repositories {
        mavenCentral()
    }
    dependencies {
        classpath 'com.h2database:h2:1.3.170'
        classpath 'org.flywaydb:flyway-gradle-plugin:3.2.1'
    }
}
 
apply plugin: 'org.flywaydb.flyway'
apply plugin: 'java'
 
flyway {
    url = 'jdbc:h2:file:target/foobar'
    user = 'sa'
}

SpringBoot

dependencies {
  /**
   * http://flywaydb.org/
   * Database Migration tool
   */
  compile "org.flywaydb:flyway-core"
}

3.1.2. application.yml(or properties) 설정

DB를 초기화하는 다양한 방법들이 있다.

  • JPA 에 의한 초기화
  • Hibernate 에 의한 초기화
  • JDBC에 의한 초기화
  • Batch를 이용한 초기화

그보다 높은 차원에서 손쉽게할 수 있는 것들이 있는데, 그중 하나가 바로 Flyway

flyway:
  enabled: true
  check-location: true # 마이그레이션 스크립트 파일이 존재하는지 여부를 확인
  locations: classpath:db/migration # 마이그레이션 스크립트 위치
  baseline-version: LATEST # 마이그레이션을 시작할 번호
  sql-migration-prefix: V
  sql-migration-suffix: .sql
  url: jdbc:h2:file:~/.database/flywaydb;DB_CLOSE_DELAY=-1;AUTO_SERVER=TRUE;DB_CLOSE_ON_EXIT=FALSE;  # Flyway 소유의 데이터소스를 생성하려고 하는 경우 사용
  user: sa # Flyway 소유의 데이터소스를 생성하려고 하는 경우 사용
  password: # Flyway 소유의 데이터소스를 생성하려고 하는 경우 사용

Flyway에 지정할 수 있는 속성은 다음과 같음

# FLYWAY (FlywayProperties)
flyway.*= # Any public property available on the auto-configured `Flyway` object
flyway.check-location=false # check that migration scripts location exists
flyway.locations=classpath:db/migration # locations of migrations scripts
flyway.schemas= # schemas to update
flyway.init-version= 1 # version to start migration
flyway.init-sqls= # SQL statements to execute to initialize a connection immediately after obtaining it
flyway.sql-migration-prefix=V
flyway.sql-migration-suffix=.sql
flyway.enabled=true
flyway.url= # JDBC url if you want Flyway to create its own DataSource
flyway.user= # JDBC username if you want Flyway to create its own DataSource
flyway.password= # JDBC password if you want Flyway to create its own DataSource

3.1.2. 디렉토리 설명

3.2. 스키마 관리방법 설명

  • 프로젝트의 소스코드와 함께 관리한다.
  • 로컬, 테스트와 출시 버전을 분리한다.
    • 로컬, 개발은 update로도 충분...
    • 테스트, 운영 등 서버는 validate 모드로 관리
  • 프로젝트의 버전관리시스템에 기능을 활용하여 버전관리가 가능

3.2.1. DB 스키마 추출방법

어디까지나 수동.... 처음에는 수동처리가 필요함...

  1. 로컬 테스트에서 Hibernate에서 DDL 쿼리를 생성하도록 정의 생성하도록 설정

    jpa:
    hibernate:
     ddl-auto: create-drop
  2. 테스트를 실행

    사용할려는 DB에 따라 생성하는 SQL 스크립트가 달라질 수 있는데, 이는H2Database 에서 제공하는 기능을 활용하여 MySQL, Oracle 등으로 변경하면 하이버네이트의 방언Dialect 에 의해 적절한 쿼리가 생성됨

  3. 쿼리를 복사하여 손질


  4. 처음 쿼리는 V1__init_db_schema.sql 로 생성

3.2.2. 변경이력 관리

프로젝트 내에 포함되어 있으니 모든 것을 형상관리시스템에 맡긴다.

3.3. 활용방안

  • 제품 출시 후 DB 스키마를 초기화하는 것이 아니라, 출시 이후 변경된 사항들에 대한 형상을 관리할 수 있다.
  • 위에서 설명한 동작방식을 상기하기 바란다.


스프링부트가 가지고 있는 강력한 기능 중 하나가, 바로 액츄에이터 이다. 그 중에서 내가 지금까지 몰랐던 Remote Shell에 대한 기능을 살펴본다. 리모트쉘은 별다른 코딩을 하지 않아도 사용이 가능하다.

리모트쉘의 의존성은 다음과 같다.

dependencies {
    compile("org.springframework.boot:spring-boot-starter-security")
    compile("org.springframework.boot:spring-boot-starter-remote-shell")
    // 생략
}

org.springframework.boot:spring-boot-starter-security 을 추가하지 않으면 다음 클래과 같은 예외가 발생하며 실패한다.

Caused by: java.lang.ClassNotFoundException: org.springframework.security.config.http.SessionCreationPolicy
    at java.net.URLClassLoader$1.run(URLClassLoader.java:372)
    at java.net.URLClassLoader$1.run(URLClassLoader.java:361)
    at java.security.AccessController.doPrivileged(Native Method)
    at java.net.URLClassLoader.findClass(URLClassLoader.java:360)
    at java.lang.ClassLoader.loadClass(ClassLoader.java:424)
    at sun.misc.Launcher$AppClassLoader.loadClass(Launcher.java:308)
    at java.lang.ClassLoader.loadClass(ClassLoader.java:357)
    ... 42 more
:bootRun FAILED

SSH와 관련해서 필요한 것으로 보인다. 리모트쉘의 기본포트는 2000번이다. 이 부분은 다음에 있는 설정코드에서 수정가능하다. 리모트쉘에서 사용하는 속성은 다음과 같다. 자세한 내용은 레퍼런스 문서를 살펴보기 바란다.

# REMOTE SHELL
shell.auth=simple # jaas, key, simple, spring
shell.command-refresh-interval=-1
shell.command-path-patterns= # classpath*:/commands/**, classpath*:/crash/commands/**
shell.config-path-patterns= # classpath*:/crash/*
shell.disabled-commands=jpa*,jdbc*,jndi* # comma-separated list of commands to disable
shell.disabled-plugins=false # don't expose plugins
shell.ssh.enabled= # ssh settings ...
shell.ssh.key-path=
shell.ssh.port=
shell.telnet.enabled= # telnet settings ...
shell.telnet.port=
shell.auth.jaas.domain= # authentication settings ...
shell.auth.key.path=
shell.auth.simple.user.name=
shell.auth.simple.user.password=
shell.auth.spring.roles=

내가 테스트를 위해 설정한 속성은 다음과 같다. application.yml:

# @author: honeymon
 
management:
  security:
    enabled: true
shell:
  telnet: # Tel
    enabled: true
    port: 10000
  ssh:
    enabled: true
    port: 10001
  auth:
    simple:
      user:
        name: honeymon
        password: remote-shell

리모트쉘에 접근하는 방법은 다음과 같다.

ssh -p <port-number> <shell.auth.simple.user.name 값>@접근서버 IP 혹은 호스트명
//위의 설정에 따르면 다음과 같이 접근이 가능하다.
ex) $ ssh -p 10001 honeymon@localhost

텔넷으로 접근하려면 다음의 의존성을 추가해야 한다.

If you want to also enable telnet access you will additionally need a dependency onorg.crsh:crsh.shell.telnet

search.maven.org crsh.shell.telnet 검색 telnet 접속해보려고 했더니 오류가 발생...

Caused by: java.lang.NoSuchMethodError: org.crsh.vfs.Resource.<init>(Ljava/net/URL;)V
    at org.crsh.telnet.TelnetPlugin.init(TelnetPlugin.java:61)
    at org.crsh.plugin.PluginManager.getPlugins(PluginManager.java:83)
    at org.crsh.plugin.PluginContext.start(PluginContext.java:327)
    at org.crsh.plugin.PluginLifeCycle.start(PluginLifeCycle.java:104)
    at org.springframework.boot.actuate.autoconfigure.CrshAutoConfiguration$CrshBootstrapBean.init(CrshAutoConfiguration.java:230)
    at sun.reflect.NativeMethodAccessorImpl.invoke0(Native Method)
    at sun.reflect.NativeMethodAccessorImpl.invoke(NativeMethodAccessorImpl.java:62)
    at sun.reflect.DelegatingMethodAccessorImpl.invoke(DelegatingMethodAccessorImpl.java:43)
    at java.lang.reflect.Method.invoke(Method.java:483)
    at org.springframework.beans.factory.annotation.InitDestroyAnnotationBeanPostProcessor$LifecycleElement.invoke(InitDestroyAnnotationBeanPostProcessor.java:349)
    at org.springframework.beans.factory.annotation.InitDestroyAnnotationBeanPostProcessor$LifecycleMetadata.invokeInitMethods(InitDestroyAnnotationBeanPostProcessor.java:300)
    at org.springframework.beans.factory.annotation.InitDestroyAnnotationBeanPostProcessor.postProcessBeforeInitialization(InitDestroyAnnotationBeanPostProcessor.java:133)
    ... 17 more

처음 접근할 경우에는 다음과 같이 인증키를 저장할지를 묻는다. 

리모트쉘로 접근하면 다음과 같은 화면을 볼 수 있다. 

리모트쉘에서 사용할 수 있는 명령어는 help 를 타이핑하면 다음과 같은 내용을 볼 수 있다. 

> help
Try one of these commands with the -h or --help switch:
 
NAME       DESCRIPTION
autoconfig Display auto configuration report from ApplicationContext
beans      Display beans in ApplicationContext
cron       manages the cron plugin
dashboard  a monitoring dashboard
egrep      search file(s) for lines that match a pattern
endpoint   Invoke actuator endpoints //앱에 설정된 애드포인트 목록들을 확인가능하다.
env        display the term env
filter     a filter for a stream of map
java       various java language commands
jmx        Java Management Extensions
jul        java.util.logging commands
jvm        JVM informations
less       opposite of more
mail       interact with emails
man        format and display the on-line manual pages
metrics    Display metrics provided by Spring Boot
shell      shell related command
sleep      sleep for some time
sort       sort a map
system     vm system properties commands
thread     JVM thread commands
help       provides basic help
repl       list the repl or change the current repl

리모트쉘은 CRaSH를 사용했다. 배너를 바꾸고 싶은데... 그 중에서 우와!!하면서 감탄했던 것이 대시보드!

화면크기에 따라 리사이징도 된다! +_+)b

스프링 액츄에이터SpringBoot actuator 에서 제공하는 엔드포인트 중 하나인 metrics 정보를 모니터링할 수 있는 metrics


리모트쉘로 원격접속해서 애플리케이션의 상태를 살필 수 있는 수단이 생겼다는 건 애플리케이션을 관리하는데 더욱 편해진다는 것이다. 리모트쉘로 접근해서... endpoint invoke shutdown을 실행하면!!

당신은 주금!!(애플리케이션을 켜로 터미널로 서버에 접속해야하는 번거로움이 생길 것이다).

리모트쉘에서 애플리케이션을 끄기 위해서는

리모트쉘에서 셧타운을 실행하기 위해서는 application.properties(or yml)에 다음 항목을 추가해야한다.

endpoints.shutdown.enabled=true

이렇게 가볍게 스프링부트가 제공하는 기능 중 하나인 리모트쉘Remote shell을 살펴봤다. 리모트쉘을 통해서 애플리케이션의 상태를 모니터링하고 제어하는 것이 가능해졌다. 스프링부트를 기반으로 배포하는 앱에는 반드시 넣어줘야할 녀석이었다. 바로! 추가!

얼마 전 Eclipse Mars가 출시하고, 스프링에서는 이클립스 마르스를 얹은 STS.3.7.0 버전을 내놓았다.

나는 지금까지 개발할 때 Lombok을 많이 사용해왔다. 클래스 내 필드에 대한 Getter/Setter 생성이나 toString(), equals(), hashCode() 메서드를 오버라이드 하기 위해 클래스에 코드가 덕지덕지 붙는 것을 어노테이션들(@ToString,@EqualsAndHashCode, @Getter, @Setter, @Data 등)로 대신할 수 있기 때문이다. 자바로 개발할 때 겪게되는 반복적이고 가독성에 크게 도움되지 않는 녀석들을 컴파일과정에서 어노테이션을 기반으로 하여 자동생성해주기에 코드가 그나마 많이 간결해진다.

그런데!! 이클립스 루나까지는 크게 문제가 없던 STS(3.6.0)에서 3.7.0으로 버전업을 하고 난 이후에 몇몇 결함이 발생한다. 예를 들어,

  • 현재 열고 있는 클래스에 대한 유닛테스트를 위해 클래스를 만들려고 하면 비어있는 파일만 생성하기
  • Getter/Setter 생성시 원인모를 예외를 발생시키기
  • 인스턴스 메서드에서 던지는 throws Exception 을 메서드에 반영하지 못함
  • 구현하고 있는 인터페이스에 메서드를 생성하지 못함

등... 개발하는 과정에서 자주하는 일들을 할 수가 없는 것은, 가뜩이나 좋지 않은, 생산성을 뚜욱하고 떨어뜨리는 슬픈 상황을 만들었다. 그래도 투덜거리면서 쓰다가,

투걸거리지만 말고, 버그 리포팅을 해서 개선할 수 있도록 해주세요.

간단하게 Getter/Setter를 만드는 작업을 진행해보면 다음과 같은 증상이 나온다.


  • 에러코드
eclipse.buildId=3.7.0.201506290652-RELEASE-e45
java.version=1.8.0_20
java.vendor=Oracle Corporation
BootLoader constants: OS=linux, ARCH=x86_64, WS=gtk, NL=ko_KR
Framework arguments:  -client -product org.springsource.sts.ide
Command-line arguments:  -os linux -ws gtk -arch x86_64 -client -product org.springsource.sts.ide -console
 
java.lang.reflect.InvocationTargetException
    at org.eclipse.jface.operation.ModalContext.runInCurrentThread(ModalContext.java:476)
    at org.eclipse.jface.operation.ModalContext.run(ModalContext.java:371)
    at org.eclipse.ui.internal.WorkbenchWindow$14.run(WorkbenchWindow.java:2156)
    at org.eclipse.swt.custom.BusyIndicator.showWhile(BusyIndicator.java:70)
    at org.eclipse.ui.internal.WorkbenchWindow.run(WorkbenchWindow.java:2152)
    at org.eclipse.ui.internal.progress.ProgressManager$RunnableWithStatus.run(ProgressManager.java:1394)
    at org.eclipse.swt.custom.BusyIndicator.showWhile(BusyIndicator.java:70)
    at org.eclipse.ui.internal.progress.ProgressManager$5.run(ProgressManager.java:1228)
    at org.eclipse.swt.widgets.Synchronizer.syncExec(Synchronizer.java:186)
    at org.eclipse.ui.internal.UISynchronizer.syncExec(UISynchronizer.java:145)
    at org.eclipse.swt.widgets.Display.syncExec(Display.java:4633)
    at org.eclipse.ui.internal.progress.ProgressManager.runInUI(ProgressManager.java:1225)
    at org.eclipse.jdt.ui.actions.AddGetterSetterAction.run(AddGetterSetterAction.java:618)
    at org.eclipse.jdt.ui.actions.AddGetterSetterAction.generate(AddGetterSetterAction.java:549)
    at org.eclipse.jdt.ui.actions.AddGetterSetterAction.run(AddGetterSetterAction.java:340)
    at org.eclipse.jdt.ui.actions.AddGetterSetterAction.run(AddGetterSetterAction.java:584)
    at org.eclipse.jdt.ui.actions.SelectionDispatchAction.dispatchRun(SelectionDispatchAction.java:279)
    at org.eclipse.jdt.ui.actions.SelectionDispatchAction.run(SelectionDispatchAction.java:251)
    at org.eclipse.jface.action.Action.runWithEvent(Action.java:473)
    at org.eclipse.jface.action.ActionContributionItem.handleWidgetSelection(ActionContributionItem.java:595)
    at org.eclipse.jface.action.ActionContributionItem.access$2(ActionContributionItem.java:511)
    at org.eclipse.jface.action.ActionContributionItem$5.handleEvent(ActionContributionItem.java:420)
    at org.eclipse.swt.widgets.EventTable.sendEvent(EventTable.java:84)
    at org.eclipse.swt.widgets.Display.sendEvent(Display.java:4481)
    at org.eclipse.swt.widgets.Widget.sendEvent(Widget.java:1327)
    at org.eclipse.swt.widgets.Display.runDeferredEvents(Display.java:3819)
    at org.eclipse.swt.widgets.Display.readAndDispatch(Display.java:3430)
    at org.eclipse.e4.ui.internal.workbench.swt.PartRenderingEngine$4.run(PartRenderingEngine.java:1127)
    at org.eclipse.core.databinding.observable.Realm.runWithDefault(Realm.java:337)
    at org.eclipse.e4.ui.internal.workbench.swt.PartRenderingEngine.run(PartRenderingEngine.java:1018)
    at org.eclipse.e4.ui.internal.workbench.E4Workbench.createAndRunUI(E4Workbench.java:156)
    at org.eclipse.ui.internal.Workbench$5.run(Workbench.java:654)
    at org.eclipse.core.databinding.observable.Realm.runWithDefault(Realm.java:337)
    at org.eclipse.ui.internal.Workbench.createAndRunWorkbench(Workbench.java:598)
    at org.eclipse.ui.PlatformUI.createAndRunWorkbench(PlatformUI.java:150)
    at org.eclipse.ui.internal.ide.application.IDEApplication.start(IDEApplication.java:139)
    at org.eclipse.equinox.internal.app.EclipseAppHandle.run(EclipseAppHandle.java:196)
    at org.eclipse.core.runtime.internal.adaptor.EclipseAppLauncher.runApplication(EclipseAppLauncher.java:134)
    at org.eclipse.core.runtime.internal.adaptor.EclipseAppLauncher.start(EclipseAppLauncher.java:104)
    at org.eclipse.core.runtime.adaptor.EclipseStarter.run(EclipseStarter.java:380)
    at org.eclipse.core.runtime.adaptor.EclipseStarter.run(EclipseStarter.java:235)
    at sun.reflect.NativeMethodAccessorImpl.invoke0(Native Method)
    at sun.reflect.NativeMethodAccessorImpl.invoke(NativeMethodAccessorImpl.java:62)
    at sun.reflect.DelegatingMethodAccessorImpl.invoke(DelegatingMethodAccessorImpl.java:43)
    at java.lang.reflect.Method.invoke(Method.java:483)
    at org.eclipse.equinox.launcher.Main.invokeFramework(Main.java:669)
    at org.eclipse.equinox.launcher.Main.basicRun(Main.java:608)
    at org.eclipse.equinox.launcher.Main.run(Main.java:1515)
    at org.eclipse.equinox.launcher.Main.main(Main.java:1488)
Caused by: java.lang.IndexOutOfBoundsException: Index: 5, Size: 5
    at java.util.ArrayList.rangeCheck(ArrayList.java:653)
    at java.util.ArrayList.get(ArrayList.java:429)
    at org.eclipse.jdt.internal.formatter.TokenManager.get(TokenManager.java:68)
    at org.eclipse.jdt.internal.formatter.TokenManager.findIndex(TokenManager.java:161)
    at org.eclipse.jdt.internal.formatter.TokenManager.firstIndexIn(TokenManager.java:188)
    at org.eclipse.jdt.internal.formatter.TokenManager.firstTokenIn(TokenManager.java:194)
    at org.eclipse.jdt.internal.formatter.SpacePreparator.visit(SpacePreparator.java:196)
    at org.eclipse.jdt.core.dom.MethodDeclaration.accept0(MethodDeclaration.java:611)
    at org.eclipse.jdt.core.dom.ASTNode.accept(ASTNode.java:2711)
    at org.eclipse.jdt.core.dom.ASTNode.acceptChildren(ASTNode.java:2782)
    at org.eclipse.jdt.core.dom.TypeDeclaration.accept0(TypeDeclaration.java:470)
    at org.eclipse.jdt.core.dom.ASTNode.accept(ASTNode.java:2711)
    at org.eclipse.jdt.internal.formatter.DefaultCodeFormatter.prepareSpaces(DefaultCodeFormatter.java:350)
    at org.eclipse.jdt.internal.formatter.DefaultCodeFormatter.prepareFormattedCode(DefaultCodeFormatter.java:193)
    at org.eclipse.jdt.internal.formatter.DefaultCodeFormatter.format(DefaultCodeFormatter.java:155)
    at org.eclipse.jdt.internal.formatter.DefaultCodeFormatter.format(DefaultCodeFormatter.java:139)
    at org.eclipse.jdt.internal.core.dom.rewrite.ASTRewriteFormatter.formatString(ASTRewriteFormatter.java:246)
    at org.eclipse.jdt.internal.core.dom.rewrite.ASTRewriteFormatter.formatNode(ASTRewriteFormatter.java:376)
    at org.eclipse.jdt.internal.core.dom.rewrite.ASTRewriteFormatter.getFormattedResult(ASTRewriteFormatter.java:187)
    at org.eclipse.jdt.internal.core.dom.rewrite.ASTRewriteAnalyzer.doTextInsert(ASTRewriteAnalyzer.java:1357)
    at org.eclipse.jdt.internal.core.dom.rewrite.ASTRewriteAnalyzer$ListRewriter.rewriteList(ASTRewriteAnalyzer.java:647)
    at org.eclipse.jdt.internal.core.dom.rewrite.ASTRewriteAnalyzer$ListRewriter.rewriteList(ASTRewriteAnalyzer.java:802)
    at org.eclipse.jdt.internal.core.dom.rewrite.ASTRewriteAnalyzer.rewriteParagraphList(ASTRewriteAnalyzer.java:1175)
    at org.eclipse.jdt.internal.core.dom.rewrite.ASTRewriteAnalyzer.visit(ASTRewriteAnalyzer.java:1811)
    at org.eclipse.jdt.core.dom.TypeDeclaration.accept0(TypeDeclaration.java:453)
    at org.eclipse.jdt.core.dom.ASTNode.accept(ASTNode.java:2711)
    at org.eclipse.jdt.core.dom.rewrite.ASTRewrite.internalRewriteAST(ASTRewrite.java:302)
    at org.eclipse.jdt.core.dom.rewrite.ASTRewrite.rewriteAST(ASTRewrite.java:291)
    at org.eclipse.jdt.internal.corext.codemanipulation.AddGetterSetterOperation.run(AddGetterSetterOperation.java:351)
    at org.eclipse.jdt.internal.core.BatchOperation.executeOperation(BatchOperation.java:39)
    at org.eclipse.jdt.internal.core.JavaModelOperation.run(JavaModelOperation.java:729)
    at org.eclipse.core.internal.resources.Workspace.run(Workspace.java:2241)
    at org.eclipse.jdt.core.JavaCore.run(JavaCore.java:5409)
    at org.eclipse.jdt.internal.ui.actions.WorkbenchRunnableAdapter.run(WorkbenchRunnableAdapter.java:106)
    at org.eclipse.jface.operation.ModalContext.runInCurrentThread(ModalContext.java:463)
    ... 48 more

라고 올챙이 프로젝트(https://github.com/hangum/TadpoleForDBTools)를 지휘하고 계시는 조현종님이 말씀하시기에 '그래, 버그를 수정할 수 있도록 돕자'하는 마음에 이클립스의 'Error View'를 열고 이클립스에서 생긴 예외상황을 찾아봤다. 그리고 이 것을 SNS에 올리니까

그거 롬복 때문에 생긴 문제에요. 롬복 최신버전 받으면 정상적으로 동작해요.

라고 지인(http://sbcoba.tistory.com/)이 알려주었다. 이 때 찾아드는 허무감이란... 요 근래에 개발환경에 큰 변화가 찾아오기는 했다.

  • JDK 7 -> JDK 8
  • Eclipse Luna -> Eclipse Mars

이런 변화를 간과하고 이클립스만 탓한 내가 부끄러워지는구나.... 사용하고 있던 롬복은 v1.14.8 버전이다. 현재(2015/08/27) project lombok에서 다운로드 가능한 버전은1.16.6(https://projectlombok.org/changelog.html)이다. 8월 16일에 반영된 내용을 살펴보니

이다. 이클립스 마르스와 관련해서 버그가 있었던 것이었다. 최신버전 받으면 해결된다. 혹은... 롬복을 사용하지 않으면 된다.


그레들Gradle 2.6을 처음 실행하면 하단에 다음과 같은 문구가 나온다.

honeymon@honeymon-blog (develop)*$ ./gradlew check
:compileJava UP-TO-DATE
:processResources UP-TO-DATE
:classes UP-TO-DATE
:compileTestJava UP-TO-DATE
:processTestResources UP-TO-DATE
:testClasses UP-TO-DATE
:test UP-TO-DATE
:check UP-TO-DATE
:backend:compileJava UP-TO-DATE
:backend:processResources UP-TO-DATE
:backend:classes UP-TO-DATE
:backend:compileTestJava UP-TO-DATE
:backend:processTestResources UP-TO-DATE
:backend:testClasses UP-TO-DATE
:frontend:compileJava UP-TO-DATE
:frontend:processResources UP-TO-DATE
:frontend:classes UP-TO-DATE
:frontend:jar UP-TO-DATE
:backend:test UP-TO-DATE
:backend:check UP-TO-DATE
:frontend:compileTestJava UP-TO-DATE
:frontend:processTestResources UP-TO-DATE
:frontend:testClasses UP-TO-DATE
:frontend:test UP-TO-DATE
:frontend:check UP-TO-DATE
 
BUILD SUCCESSFUL
 
Total time: 11.503 secs
 
This build could be faster, please consider using the Gradle Daemon: https://docs.gradle.org/2.6/userguide/gradle_daemon.html

이 빌드가 더 빨라질 수 있다, 그레들 데몬은 실행하는 것을 고려하라!https://docs.gradle.org/2.6/userguide/gradle_daemon.html

그레들 빌드가 조금 굼뜬 느낌이 있었는데, 빨라진다면!! 바로 위의 링크로 이동했다.

글을 쭈욱 내리고 '난이도'를 살펴봤다.


아래 명령어만 운영체제에 맞춰서 커맨드라인에서 실행하면 된다. 그레들 홈디렉토리에 데몬실행속성을 활성화하는 (org.gradle.daemon=true) gradle.properties 파일을 추가생산하는 것으로 간단하게 처리가 되었다.

  • Windows

    (if not exist "%HOMEPATH%/.gradle" mkdir "%HOMEPATH%/.gradle") && (echo "org.gradle.daemon=true" >> "%HOMEPATH%/.gradle/gradle.properties")
  • Linux or Unix

    touch ~/.gradle/gradle.properties && echo "org.gradle.daemon=true" >> ~/.gradle/gradle.properties

The Gradle Daemon is not enabled by default. However, once it is enabled it is sometimes desirable to disable for some projects or for some build invocations.

그레들 데몬은 기본설정은 활성화되지 않는다. 그러나, 한번 활성화 되고 나면 몇몇 프로젝트 빌드요청에서는 비활성화 하고 싶을 것이다.

The --no-daemon command line switch can be used to force that a Daemon not be used for that build. This is rarely used, but can sometimes be useful when debugging issues with certain builds or Gradle plugins. This command line switch has the highest precedence when considering the build environment.

커맨드라인 스위치 --no-daemon 강제로 사용하는 데몬을 빌드시 사용하지 않도록 할수 있다. 이것은 거의 사용되지 않고, 특정 빌드 또는 Gradle 플러그인 문제를 디버깅 할 때 때때로 유용 할 수 있다.

보다 상세한 내용은, https://docs.gradle.org/2.6/userguide/gradle_daemon.html 를 읽어보시길...

GopherCon Korea 2015 후원사 중 하나인 미미박스의 '개발자 채용공고'

2015/08/16 - [Records] - 20150815, Gophercon korea 2015 참관기

http://www.rocketpunch.com/recruit/420/

ㅎㅎ... 풍요 속의 빈곤... 이라는 말이 있기는 하지만, 그래도 기회를 만들 수 있으니, 한번 도전해봄직하지 않은가?

  개발환경이 맘에 들긴 든다. 오우!!

개발자들이 귀해진 시대가 되었다. 

자신의 가치를 높이는 것에 노력을 아끼지 마라.


어느 시점이 되면, 개발을 단순히 '재미'로 접근할 수 없는, 순간이 온다. 그 때를 위해서 '미래'를 설계하려는 노력은 필요하다. '미래'를 설계하고 그에 대한 투자를 하기 바란다. 개발자로서 자신의 실력을 키우면 분명히 많은 '기회'가 찾아온다. 

그건 다른 사람이 정하는 것일 수도 있지만, 그 결정을 내가 강요할 수 있다. 

랄까?자기 삶은 자기가 사는 것 아니겠는공?

+ Recent posts